ヤマネコでもわかるQtQuick(3)-QMLとC++を用いた描画枠の作成
要望があったので少し予定変更して進めます。 説明は後回しにして,コード例の紹介を優先します。
早速
新しく次のコードを準備します。
// main.cpp

#include <QApplication>
#include <QQmlApplicationEngine>
#include <QtQml>
#include <QTextCodec>
#include <QQuickView>

#include "Drawing.h"

int main(int argc, char **argv){
    QApplication app(argc, argv);
    QTextCodec::setCodecForLocale(QTextCodec::codecForLocale());

    qmlRegisterType<Drawing>("DrawingArea", 1, 0, "Drawing");
    QQmlApplicationEngine engine("main.qml");

    return app.exec();
}
// main.qml

import QtQuick 2.0
import QtQuick.Controls 1.1
import DrawingArea 1.0

ApplicationWindow{
    id: applicationWindow1
    width: 800
    minimumWidth: 640
    height: 600
    minimumHeight: 480
    color: "white"
    title: qsTr("QtSample")
    visible: true

    Rectangle {
        y: 80
        width: 180; height: 150
        anchors.horizontalCenterOffset: 2
        anchors.horizontalCenter: parent.horizontalCenter
        color: "lime"
        radius: 5
        Label {
            x: 10; y: 10
            id: label
            font.pixelSize: 18
            text: qsTr("Label")
        }
        Button {
            id: button
            x:30; y:40
            width: 120
            text: "Button"
            onClicked:{
                drawingarea.setNum(combo1.currentIndex)
                drawingarea.setColor(combo2.currentText)
                drawingarea.update()
            }
        }
        ComboBox {
            id: combo1
            x:50; y:80
            width: 100
            model: ["A", "B", "C", "D", "E"]
        }
        ComboBox {
            id: combo2
            x:50; y:110
            width: 100
            model: ["red", "green", "blue", "yellow", "pink"]
        }
    }
    Rectangle {
        id: rect2
        y: 300
        width: 330; height: 250
        anchors.horizontalCenterOffset: 2
        anchors.horizontalCenter: parent.horizontalCenter
        color: "black"
        Drawing {
            id: drawingarea
            x: 5; y: 5
            width: 320; height: 240
        }
    }
}
// Drawing.h

#include <QQuickPaintedItem>
#include <QColor>
#include <QPen>
#include <QPainter>
#include <QRect>
#include <QFont>

class Drawing : public QQuickPaintedItem{
    Q_OBJECT
    Q_DISABLE_COPY(Drawing)

public:
    explicit Drawing(QQuickItem *parent = 0);

    Q_INVOKABLE void setNum(const int &num);

    Q_INVOKABLE void setColor(const QString &color);

    void paint(QPainter *painter);

private:
    QString m_num;
    QColor m_color;
};
// Drawing.cpp

#include "Drawing.h"

Drawing::Drawing(QQuickItem *parent) : QQuickPaintedItem(parent){
    m_color = QColor("red");
    m_num = "A";
}

void Drawing::setNum(const int &num){
    m_num = QString('A'+num);
}

void Drawing::setColor(const QString &color){
    m_color = QColor(color);
}

void Drawing::paint(QPainter *painter){
    QFont font = QFont();
    QPen pen(m_color, 3);
    QRect rect(0, 0, 100, 100);
    rect.moveTo(110, 70);
    font.setPointSize(30);
    painter->setFont(font);
    painter->setPen(pen);
    painter->setRenderHints(QPainter::Antialiasing, true);
    painter->fillRect(rect, "white");
    painter->drawText(150, 110, m_num);
}
.proファイルは前回と同様に作成してください。 その中に次のコードを追記します。
QT += qml quick widgets gui

SOURCES += main.cpp Drawing.cpp
HEADERS += Drawing.h
実行
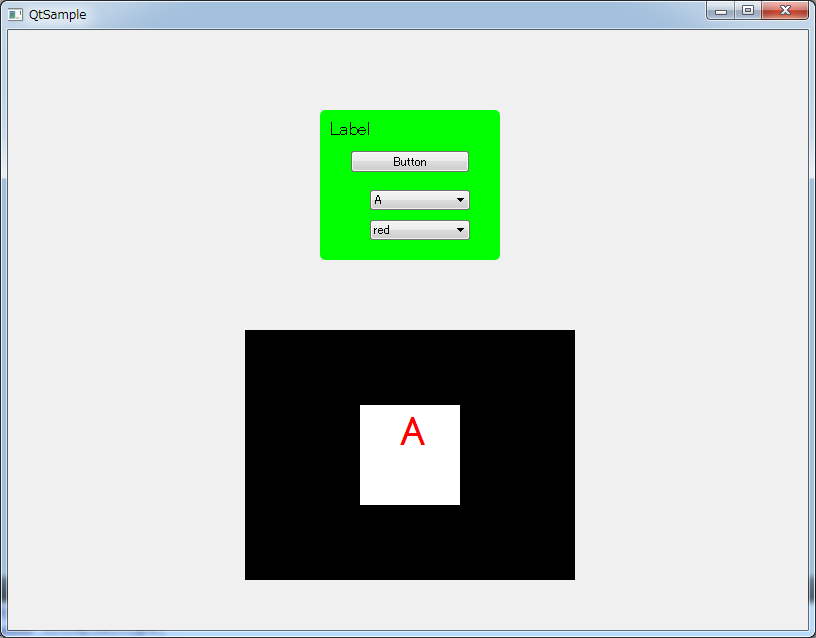
これを実行すると,次のような画面が出てきます。

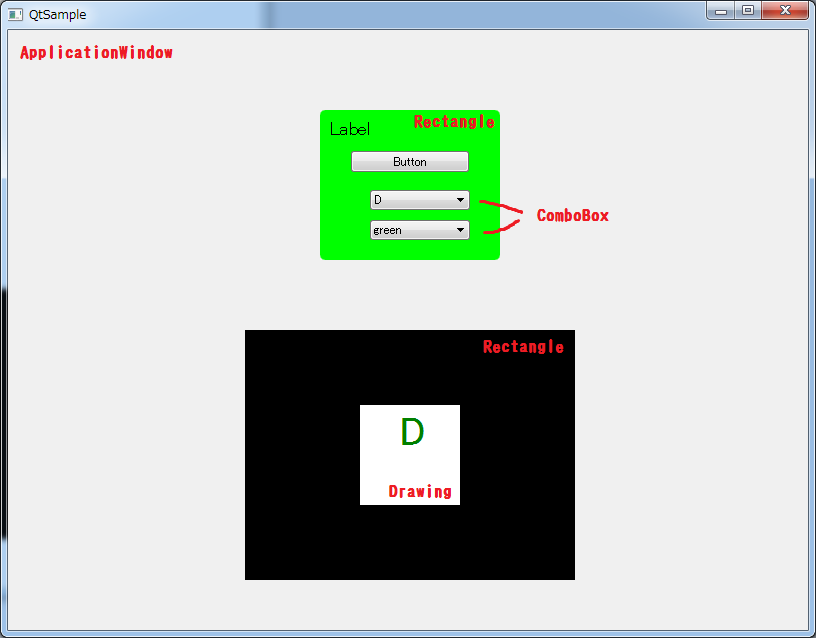
一応QMLとの対応付けをしておきます。

ComboBoxの内容をいじくり,ボタンを押すと表示されるテキストが変わりました。
概説
今回はQMLに新しい要素,"Drawing"を入れました。
お気づきかと思いますが,これはC++で書いたDrawingクラスのことです。
qmlRegisterType<Drawing>("DrawingArea", 1, 0, "Drawing");
このコードで,QMLの中からDrawingArea 1.0をインポート出来るようにします。 あとはQMLの中でDrawingを呼び出せば指定したエリアに表示することが出来ます。
(このようにQMLに配置したいクラスは,QObjectを継承したクラスである必要があります。またコード内に意味不明なマクロが入っていますが,次回以降と言うことにします。)
また,ボタンが押されたときの動作は次のように書いていました。
onClicked:{
    drawingarea.setNum(combo1.currentIndex)
    drawingarea.setColor(combo2.currentText)
    drawingarea.update()
}
今回の場合Drawingのidを"drawingarea"としていたので,Drawingのメソッドをこのように呼び出すことが出来ます。
void Drawing::paint(QPainter *painter){
    QFont font = QFont();
    QPen pen(m_color, 3);
    QRect rect(0, 0, 100, 100);
    rect.moveTo(110, 70);
    font.setPointSize(30);
    painter->setFont(font);
    painter->setPen(pen);
    painter->setRenderHints(QPainter::Antialiasing, true);
    painter->fillRect(rect, "white");
    painter->drawText(150, 110, m_num);
}
これがDrawingの描画本体部分です。 基本的にはQPainterに対して何らかの描画を行っていきます。 今回の場合,フォントと色を設定した後に与えられた文字を描画処理しています。 再描画したい場合はこの関数ではなく,update()を呼び出します。
次
次回はC++とQMLの別の連携法をまとめるのではないでしょうか(未定)
何回かはコードを掲載することに重点を置いてブログ更新します。